Exposure

Overexposed?? - No Problem (Part 3)

We left off with last time in this series having completed exposure and recovery adjustments.  The next step is to selectively adjust only the highlights.  The easiest (90% of the time) way to do this is the Highlights and Shadows Adjustment sliders (as Aperture calls them).

In this case, we obviously want to reduce the highlights, so that's the one we'll work with.  Pull the slider to the right and watch the preview.  It's takes a little bit of a feel to know how much is too much, but the general rule of thumb is to watch the mid-tones.

Move the slider while watching your preview, as soon as you see the mid-tones of the image being impacted by the Highlights slider - stop.  Now back off the adjustment just a bit.

Highlight Adjustment.jpg

The results can be significant, as the histogram below demonstrates.  Notice the better balanced readings, with nothing on the right edge.

Ending Histogram.jpg

Compare that to the original histogram before we started with any adjustments.  Major improvement here overall - including a successful recovery of the blown out areas (Only RAW would allow you to accomplish this!

Beginning Histogram.jpg

And here is the final exposure result.  The only other adjustment made here was a slight tweak to the Black Point slider.  A usable and pleasing image has emerged from a shot that was destined for the trash can!

5 - Black Point Adjustment.jpg

Stay tuned . . . more tips to come in the week and months ahead, including one technique where we will actually straddle that right exposure limit - on purpose!

Stay in Focus,

Mark

Overexposed?? - No Problem! (Part 2)

The first step in this quick process starts with the Recovery Slider (Note, this is what Aperture calls it - other programs have similar functions with different names).  The key feature of this slider is that it's a "selective adjustment".

~A selective adjustment only impacts certain areas of the image, based on different criteria.  The Recovery slider selectively reduces exposure and allows recovery of only the most "blown out" areas of the image~

The impact of this slider is significant as it pulls back the most overexposed elements of the image, beginning the process of recovering detail.  We then adjust our second slider, exposure.  Notice that we tweak this just about a third of a stop negative, to assist in our recovery.  Go easy on this slider, and only use it after you've gotten everything you can out of the Recovery Slider.  Exposure is a global adjustment, and will impact all areas of the image.

Slider Adjustments
Slider Adjustments

At this point in the image, you can start to see the blown out areas begin to tone down - but it looks like we still have a long way to go (as you can see in the image blow, sampled after these two adjustments were made).

Highlight and Exposure Adjusted

Now, don't get discouraged yet!  Even though the image still shows a long way to go, look at how much improvement we've really made - as indicated by the histogram.

Histogram after recovery and expsoure adjustments.

So demonstrated progress has been made - and sets the foundation for everything else to come.  With the highlights themselves now properly recovered, we're ready to move on to the most visible corrective adjustment.  In Part 3 of this series we will focus on selectively recovering detail in the highlights - this is where the image really starts to "pop".

Stay in Focus,

Mark

Don't Let the Mid-Day Sun Ruin Your Photo Outing

2012 2012 08 31 31 | 12 30 56 | B83H5981 HDR  Version 2 Yes, for outdoors shooting it's hard to beat the "magic hours" of sunrise and sunset - and the two to three hours after sunrise and before sunset aren't too bad either.  But what do you do with that "11-3" slot?  Here's two scenarios to try.

Get in Close

The harsh mid-day light will have less impact on your shots if you get in close to the subject and eliminate any background elements.  You purposefully minimize the high contrast range in your shot.  The engine shot above was at high noon.  By getting in close I eliminated the bright sky and white concrete - not to mention the reflections off the leading wing edges.

2012 2012 09 08 08 | 10 19 37 | E01C0139 HDR  Version 2

Shoot HDR

You don't like HDR you say?  Really?  Maybe it's the "grungy" HDR that doesn't suit your style?

Remember, that "grungy" and exaggerated look is only one style of HDR.  High Dynamic Range photography can look anywhere from very natural all the way to over the top.  Shooting HDR at high noon (the way the second image above was shot) makes the lighting conditions virtually irrelevant.  Take 3 to 5 shots over a range of exposures, use your favorite HDR or stacking program and make a great natural looking shot.

Many More Ways

There are many other scenarios to use during "bad" lighting times, not just these.  Plenty of interesting things can be found in the shade and a small diffuser can give you a bit of your own shade for smaller objects.  Flowers, insects, old fences, abandoned equipment.  Take the time to look and you'll find your mid-day shots!

Stay in Focus,

Mark

White on White

Excerpt from "The Shooter's Blueprint" Series MCT Vanity Owl

I've received a lot of questions lately due to a guest post I did on Photographer Rick Sammon's Blog regarding capturing a white subject on a white background.  Especially with winter around the corner for some of us, I hope the tips below help.

Shooter's Blueprint

White Subject on White Background

The settings will vary depending on what the exact scenario is, so let's use the parameters below.

NewImage

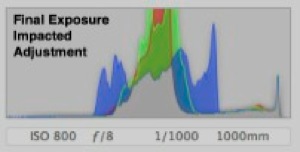
The trick to this shot is to expose as far to the right as you possibly can, without blowing any highlights out.  With a white subject, you want your data to be almost entirely in the right third of the histogram.  Anything less than that and your whites will start to look muddy, and correcting them will result in less than stellar results.

Blueprinter’s disclaimer – there is always more than one way to accomplish something, this just happens to be the way that works for me.  All adjustment references are related to Apple Aperture software - other packages have similar adjustments.

Camera Setup:

  • Exposure Program: Shutter Priority
    • Aperture is not an issue with this shot - there is only one subject and it is fairly far away.  (Depth of Field on this shot was around 1.5 feet)
  • Shutter Speed: For a moving subject, 1/1,000th is minimum - I chose 1/2,500th for these owl shots
  • ISO: 400
  • Exposure Compensation: 1.67ev
    • It's takes time to get a feel for this, just remember what you're trying to accomplish (exposing for the whites, as far to the right as you safely can and no blown highlights) takes practice.  It was a bright day and a lot of white in front of me - I started at 2.0ev and came down slightly after consulting my histogram. (oh yea, take test shots before the feathers start flying!)
  • Focus: AI Servo (Canon speak for continuous)
    • I used a cluster of focus points in the right of my frame as this owl was making his runs into the wind (right to left).  Using the right points allows me to leave room in front of the owl.
    • When focusing on a white subject, find some contrast to lock onto (that's how most focus systems work)  The Owl's upper chest with the dark bands was perfect and roughly on the same plane as his head and eyes.

Original RAW Shot

MCT Raw owl

Original Histogram

Raw histo

Post Processing:

  • White balance: Tweaked slghtly
  • Black point: Adjustment cranked up about halfway
    • Just shy of blocking the dark claws
  • Definition Slider:Moderate adjustments (up to half way)
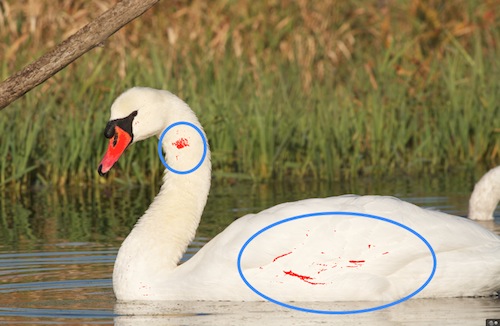
    • Be careful not to blow any highlights out in the process
  • Shadows Adjustment: Moderate to high adjustments here returning depth and detail
  • Levels Adjustment:Basic adjustments as needed for accurate balance.
    • Be careful of a blueish color cast bleeding over into the subject
  • Sharpening: To personal taste and output goals

The adjustments above yielded the results below.

Final Image

MCT Final owl

Final Histogram

Final Histo 1

Your digital sensor captures more detail in the right third of the histogram, so the goal here is to get as much of this "white" data in that area - without blowing any highlights - I know, it's a thin line to walk, but you can get ever closer to it with practice.  Post processing (Black Point, Definition and Shadows adjustments) then allows use of this maximum data to adjust as needed and end up with a great shot!

One Final Tip . . .

This technique is accomplished shooting raw - so don't go by the image on your camera's back screen as reference in the field (it will look washed out).  Rather make sure you didn't blow any highlights (no "blinkies" in your histogram) and create your final image in post.

Have fun and stay in focus!

Mark